Building a Rune
In this tutorial we will go from 0-60 on how to build a Rune, run it, serve it, and test it on a mobile app.
Finding a Model
The first step of creating a Rune is to find (or train) a Machine Learning Model that matches your application.
Developers embedding Rune in their applications can provide inference backends for any model type they want, but by default Rune comes with support for TensorFlow Lite.
Several pre-trained TensorFlow Lite models are available for download from the TF Hub, so let's head over and download one.
For this application we'll be using an Image Classification model called
aiy/vision/classifier/food_V1 which has been trained to detect
different foods in an image.
If you scroll down to the "Model Formats" section there is a "TFLite" tab with a download link.

For convenience, let's give the model file a more usable name like
food.tflite.
We can use the rune command to inspect food.tflite and see what its inputs
and outputs are.
$ rune model-info food.tflite
Ops: 33
Inputs:
    input: UInt8[1, 192, 192, 3]
Outputs:
    MobilenetV1/Predictions/Softmax: UInt8[1, 2024]
We can see that the input is one 192x192 image which has 8-bit RGB pixels and
the output is a 1x2024-element array of unsigned 8-bit integers. Presumably
these u8 values are a "confidence" value and there is one for each type of
food the model was trained on.
Creating the Runefile
Machine learning is about more than just training models, at some point you will need to read data from the real world, process that raw data into something the model expects, and do some post-processing to turn the model's output into something your application can use.
All of this is done using a Runefile, a special YAML file which rune can use
to compile the machine learning pipeline into executable WebAssembly code.
First create a new folder with an empty Runefile.yml and copy food.tflite
into it.
$ mkdir food && cd food
$ touch Runefile.yml
$ cp ~/Dowloads/food.tflite .
$ ls
Runefile.yaml food.tflite
Now we can flesh out the Runefile.
version: 1
image: runicos/base

pipeline:
  image:
    capability: IMAGE
    outputs:
      - type: u8
        dimensions: [1, 192, 192, 3]
    args:
      width: 192
      height: 192
      pixel_format: "@PixelFormat::RGB"
  classify:
    model: "food.tflite"
    inputs:
      - image
    outputs:
      - type: u8
        dimensions: [1, 2024]
  serial:
    out: SERIAL
    inputs:
      - classify
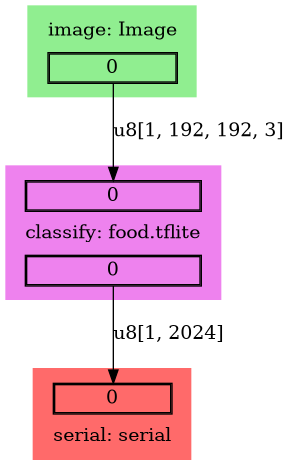
This specifies a machine learning pipeline which reads a u8[1, 192, 192, 3]
from an IMAGE capability called image, passes it to the food.tflite model
which we've named classify, and sends the resulting u8[1, 2024] to a
SERIAL output called serial.
The rune graph command makes this a lot easier to visualise:
$ rune graph Runefile.yml | dot -Tpng > food.png
This is a relatively simple linear pipeline, but Rune's ability for abstraction really shines with more complex pipelines like Style Transfer.
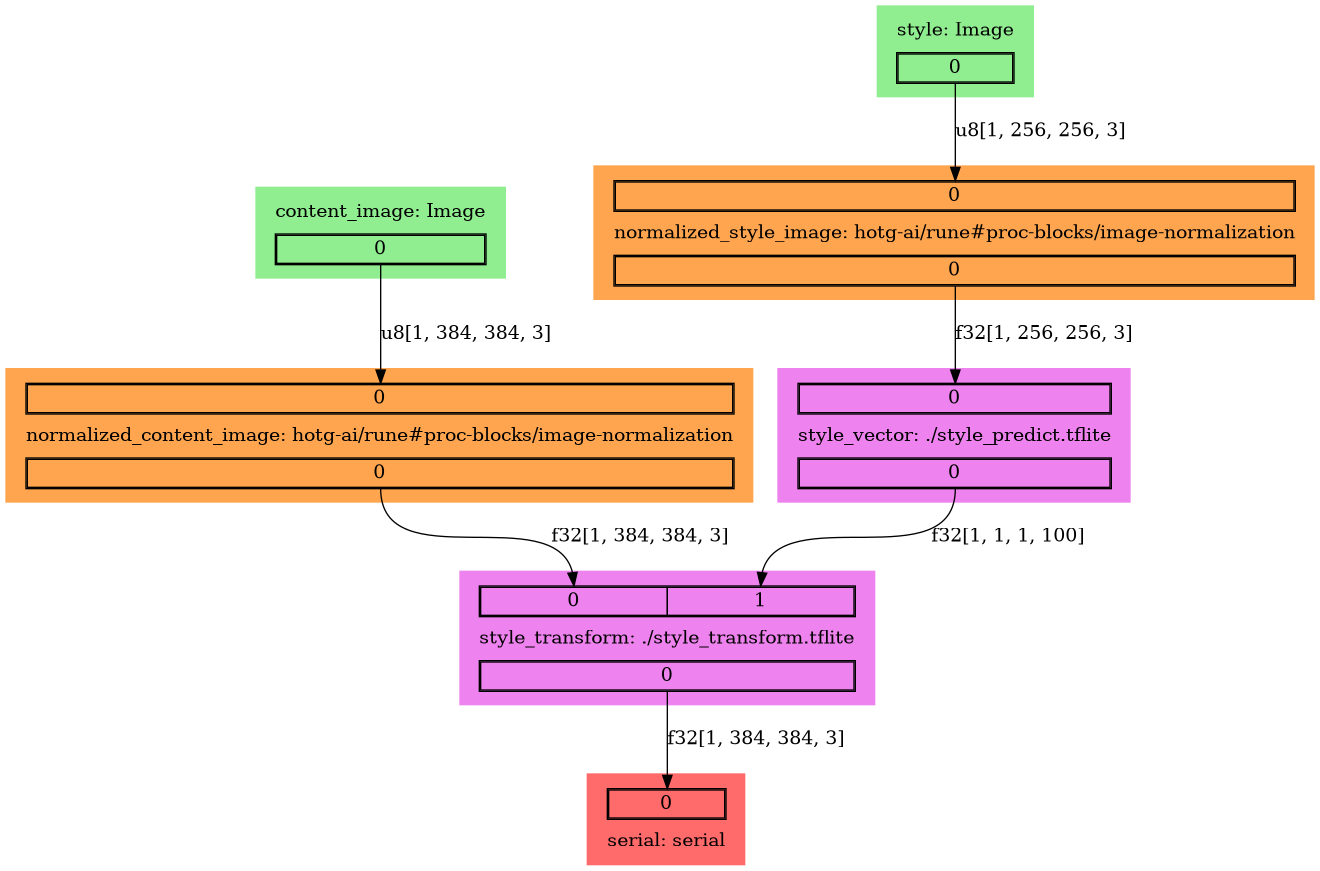
The Style Transfer Rune takes the "style" from one image (e.g. a painting), derives a "style vector" for it, and tries to apply that style to another image.
Imagine having an app on your phone that lets you take a photo and see what it would look as a Van Gogh.
Visit Runefile reference to learn how to write.
Let's take it for a spin
Ok, so far we have assembled the food.tflite model and have written the initial
Runefile.yaml. Let's now compile and test what we have so far.
Build the Rune
Follow the docker based command to run the rune. We are calling the rune cli from within docker, and mapping our current directory in docker (‘nix pwd) to the virtual mount in docker. This allows docker to access the current directory containing the Runefile.yaml and helps write the .rune file.
$ rune build Runefile.yaml
[2021-08-06T08:31:26.469Z INFO  hotg_rune_codegen::environment] Generating the project in "/home/user/.cache/runes/food"
   Compiling food v0.0.0 (/home/user/.cache/runes/food)
    Finished release [optimized] target(s) in 1.57s
[2021-08-06T08:31:28.382Z INFO  hotg_rune_cli::build] The Rune was written to "/home/user/food/food.rune"

# Check the directory now
$  ls
Runefile.yml  food.rune  food.tflite
You should see a food.rune file that is created from this file. You can name
the Rune whatever you want using the --name argument, but it defaults to the
name of the Runefile's directory.
We can use the rune tool to learn more about a compiled Rune. This is useful
for knowing what capabilities (inputs provided by the host) will need to be
available when running the Rune.
$ rune inspect food.rune
Compiled by: hotg-rune-cli v0.4.1-dev (7396914 2021-08-06)
Capabilities:
  image (Image)
    Outputs:
    - u8[1, 192, 192, 3]
    Parameters:
    - pixel_format: String("@PixelFormat::RGB")
    - width: Int(192)
    - height: Int(192)
Run the rune
Running the Rune on the terminal is an easy way to check if it is working correctly.
First let's download an image of some food.
$ curl -o ramen.jpeg https://raw.githubusercontent.com/hotg-ai/test-runes/master/image/food/assets/original_ramen.jpeg

$ rune run food.rune --image ramen.jpeg
[2021-08-06T08:45:42.135Z INFO  hotg_rune_cli::run::command] Running rune: food.rune
[2021-08-06T08:45:42.384Z INFO  hotg_rune_runtime::common_outputs] Serial: {"type_name":"u8","channel":2,"elements":[0,0,0,0,0,0,...],"dimensions":[1,2024]}
In fact there are many more zeros in the elements (2024 of them!), but we've trimmed it here for display.
You should notice a few things:
- We called
rune runonfood.runeand passed it the image we want to identify - The output is the raw model output from TF lite model with the dimensions 2024 and it is not very useful right now.
As an aside, if you forgot the --image ramen.jpeg you may have been greeted
with an error like this:
$ rune run food.rune
[2021-08-06T08:47:32.167Z INFO  hotg_rune_cli::run::command] Running rune: food.rune
Error: Unable to initialize the virtual machine

Caused by:
    0: Unable to call the _manifest function
    1: RuntimeError: Unable to create the "IMAGE" capability
           at <unnamed> (<module>[22]:0x1353)
    2: Unable to create the "IMAGE" capability
    3: No sources were provided for this capability type (hotg_rune_cli::run::image::Image)
This says we weren't able to initialize the Rune runtime because no sources
were provided for the "IMAGE" capability.
Anyway, our initial smoke test passes so let's do something to clean up this output.
Adding Processing Blocks to Runes
To make sense of the model output we need to process it and make it more human readable.
Looking back at the description on our food model's TensorFlow Hub page, we can see that the model output is a probability vector of dimension 2024, corresponding to a background class and one of 2023 food dishes in the label map.
The page also has a link to download the label map as a CSV.
We can use this list in the Runefile as a the arguments to a "label" processing block.
(Note: We have trimmed the list for display here)
version: 1
image: runicos/base
pipeline:
  image:
    capability: IMAGE
    outputs:
      - type: U8
        dimensions: [1, 192, 192, 3]
    args:
      width: 192
      height: 192
      pixel_format: "@PixelFormat::RGB"
  food:
    model: "./food.tflite"
    inputs:
      - image
    outputs:
      - type: U8
        dimensions: [1, 2024]
  most_confident_index:
    proc-block: "hotg-ai/proc-blocks@v0.11.3#most_confident_indices"
    inputs:
      - food
    outputs:
      - type: U32
        dimensions: [3]
    args:
      count: 3
  label:
    proc-block: "hotg-ai/proc-blocks@v0.11.3#label"
    inputs:
      - most_confident_index
    outputs:
      - type: UTF8
        dimensions: [1, 3]
    args:
      wordlist: |
        background
        Chaudin
        Bambalouni
        Ghoriba
        Mango_sticky_rice
        ...
        Kondowole
  serial:
    out: SERIAL
    inputs:
      - label
Notice the following change in the YAML file now:
- We have a block called
labelwhich is a processing block. Rune ships with several out of the box processing blocks such aslabelproc block that maps the output of a model to the right label. You can author your own proc block too! - The input to the serial block is no longer the model, but the label block.
Let's compile and give this a try.
$ rune build Runefile.yml

$ rune run food.rune --image ramen.jpeg

[xxx INFO  runicos_base::image] Serial: {"type_name":"u8","channel":2,"elements":["__background__","__background__","__background__”....,"__background__"],"dimensions":[2024]}
Ok it worked but now it has 2024 elements output and most of them are ,"background" - which is useless for us to check easily.
Lets add another processing block - this time we'll use one that only selects a
few top predictions. Fortunately, the Rune repo already contains a
most_confident proc block we can use.
version: 1
image: runicos/base
pipeline:
  image:
    capability: IMAGE
    outputs:
      - type: U8
        dimensions: [1, 192, 192, 3]
    args:
      width: 192
      height: 192
      pixel_format: "@PixelFormat::RGB"
  food:
    model: "./food.tflite"
    inputs:
      - image
    outputs:
      - type: U8
        dimensions: [1, 2024]
  most_confident_index:
    proc-block: "hotg-ai/proc-blocks@v0.11.3#most_confident_indices"
    inputs:
      - food
    outputs:
      - type: U32
        dimensions: [3]
    args:
      count: 3
  label:
    proc-block: "hotg-ai/proc-blocks@v0.11.3#label"
    inputs:
      - most_confident_index
    outputs:
      - type: UTF8
        dimensions: [1, 3]
    args:
      wordlist: |
        background
        Chaudin
        Bambalouni
        Ghoriba
        Mango_sticky_rice
        ...
        Kondowole
  serial:
    out: SERIAL
    inputs:
      - label
or, you can use path to the label file.
version: 1
image: runicos/base
pipeline:
  image:
    capability: IMAGE
    outputs:
      - type: u8
        dimensions: [1, 192, 192, 3]
    args:
      width: 192
      height: 192
      pixel_format: "@PixelFormat::RGB"
  classify:
    model: "./food.tflite"
    inputs:
      - image
    outputs:
      - type: u8
        dimensions: [1, 2024]
  most_confident:
    proc-block: "hotg-ai/proc-blocks@v0.11.3#most_confident_indices"
    inputs:
      - classify
    outputs:
      - type: U32
        dimensions: [3]
    args:
      count: 3
  label:
    proc-block: "hotg-ai/proc-blocks@v0.11.3#label"
    inputs:
      - most_confident
    outputs:
      - type: UTF8
        dimensions: [3]
    args:
      wordlist: $WORD_LIST
  serial:
    out: SERIAL
    inputs:
      - label

resources:
  WORD_LIST:
    path: ./aiy_food_V1_labelmap.csv
    type: string
You should notice the following changes:
- We have added a block called
most_confidentthat is before thelabelblock. This proc block sorts the highest probability items and we are selecting the top 3 (count). All of this is configurable in the Runefile! You can read all the supported proc blocks in the rune repository here. - The input to the label block is now the most_confident block. The rest of the pipeline stays the same.
Let's compile and give this a try.
# Build the new Runefile.yaml
$ rune build Runefile.yaml

# Run the docker to call rune run command
$ rune run food.rune --image ramen.jpg

# you should see an output like this

[xxx INFO hotg_runicos_base::image] Serial: {"type_name":"&str","channel":2,"elements":["Barbacoa","Fried_chicken","Spaghetti"],"dimensions":[3]}
Voila! Now we just see 3 outputs and they are all proper labels. It has classified the Ramen as Barbacoa, fried chicken, and spaghetti in this case.
Oh, well looks like the model needs tuning in the future :)
This iterative way of building and testing Rune demonstrates the composable nature of Rune tools making it extremely powerful for machine learning engineers to build and deliver a containerized model. This pipeline on edge is what we call TinyML Ops. This is how we bring production grade tools for testing, repeat builds, and deployment to TinyML.
How about on the phone?
Runes are magical - we can deploy this rune on a phone using our Rune app sdk (open source as well!) and you will be able to add the ability to run TF Lite models on the phone.
We have built a mobile app that allows you to test your Runes instantly on the app and evaluate how it performs. This ability to deploy runes immediately on the phone for testing is what makes Rune tools so powerful to build tinyML apps for edge devices. It is all about the speed of testing in a production-like environment.
First download the Runic mobile app from the app store.
Next you need to serve the food.rune you just built to be deployed to the phone. In order to do that we are going to use a rune-serve docker image.
Follow along:
# First make sure you are still in the food directory
$ ls
Runefile.yaml food.rune     food.tflite   ramen.jpg

# Make a directory called static for serving the food.rune
$ mkdir static

# copy the food.rune into static as static.rune (this is for now)
$ cp food.rune static/static.rune

$ ls static
 Static.rune

# now use the docker for rune-serve to serve the static.rune
$ docker run -e RUST_LOG=INFO -v `pwd`/static:/app/static tinyverseml/rune-serve

INFO  ureq::unit > sending request GET http://localhost:4040/api/tunnels
INFO  ureq::unit > sending request GET http://localhost:4040/api/tunnels
INFO  ureq::unit > sending request GET http://localhost:4040/api/tunnels
INFO  rune_serve > NGROK = https://3b429607ff99.ngrok.io/
INFO  rune_serve > Couldn't open browser url
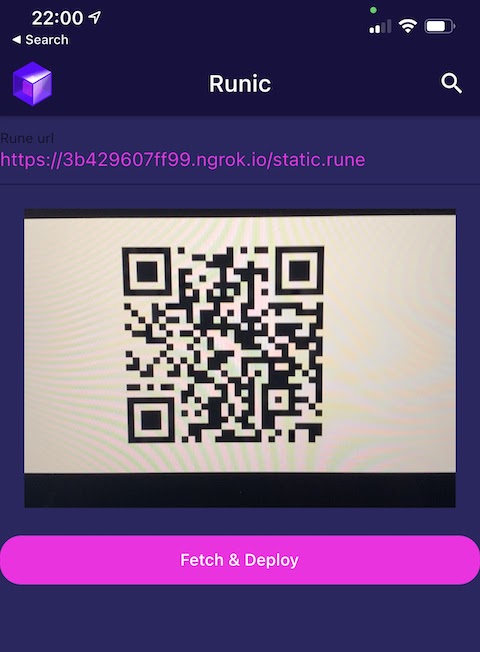
Open the URL the serve generated in a browser - example in this case it was https://3b429607ff99.ngrok.io/
This should show a page with QR code in it! You can now scan the QR code using the Runic mobile app to hot load the rune on the phone for testing.
Scan
Predict
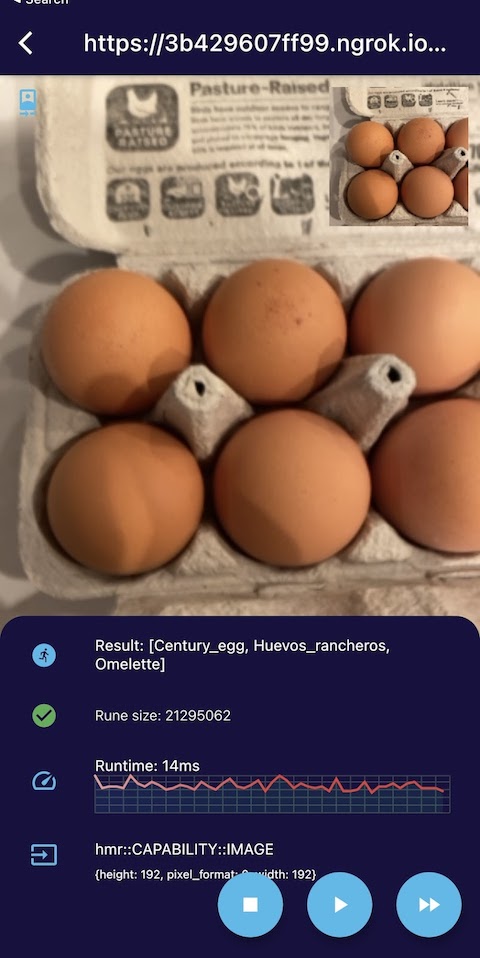
And with that you have an end to end tutorial of how to build, run, test, serve, and evaluate a rune on the phone. The world of tinyML just got the same power and tools of cloud ML.
Resources
You can clone our test-runes repo from here - https://github.com/hotg-ai/test-runes. If you go to the image/food directory you will see all the material you need for this demo including:
- Runefile.yml
- food.tflite model
- food.rune - we have already built this rune for you but feel free to delete and rebuild using steps above
Runes have much more expressive power which we hope to explain more in details using other sections in this docs. Feel free to reach out to us ond [discord]](https://discord.gg/gPCNNvRnF4).
Note on Windows
The tutorial commands were all using a ‘nix system - Mac intel or linux system. Windows also works but the paths in the command cannot be dynamic. So here is how it can work on windows:
- Make sure you have installed docker on windows. Specifically you need to ues the following resources:
- Need to install WSL first - https://docs.microsoft.com/en-us/windows/wsl/install-win10#simplified-installation-for-windows-insiders
- Then need to install docker on windows - https://docs.docker.com/docker-for-windows/install/
- Use windows powershell
- Replace the dynamic path in the docker command like
pwdwith the specific full path - Do not use full path like this: D:\mydir\food but it should be /d/mydir/food
- For example here are the commands to build, run, and serve on windows:
docker run -v /d/mydir/food:/d/mydir/food -w /d/mydir/food  -i -t tinyverseml/rune-cli /usr/local/bin/rune build Runefile.yaml

docker run -v /d/mydir/food:/d/mydir/food -w /d/mydir/food  -i -t tinyverseml/rune-cli /usr/local/bin/rune run food.rune --capability=image:./ramen.jpg

docker run -e RUST_LOG=INFO -v /d/mydir/food/static:/app/static tinyverseml/rune-serve