Lesson 4: Integrating With The Browser

In this lesson, we will build a simple React web app that uses the browser runtime to run a Natural Language Processing Rune.
Steps
Setting Up the React App
Before we begin, we will need to create a new React app using
create-react-app and the TypeScript template.
$ yarn create react-app lesson-4 --template typescript
$ cd lesson-4
$ tree -I node_modules
.
├── package.json
├── public
│   ├── favicon.ico
│   ├── index.html
│   ├── logo192.png
│   ├── logo512.png
│   ├── manifest.json
│   └── robots.txt
├── README.md
├── src
│   ├── App.css
│   ├── App.test.tsx
│   ├── App.tsx
│   ├── index.css
│   ├── index.tsx
│   ├── logo.svg
│   ├── react-app-env.d.ts
│   ├── reportWebVitals.ts
│   └── setupTests.ts
├── tsconfig.json
└── yarn.lock

2 directories, 19 files
If you are following along in GitPod, you might want to run this in a different
folder (e.g. /tmp) so you can use the lesson-4 app as a reference.
Once yarn create has finished, we can add Rune's browser runtime as a
dependency.
$ yarn add @hotg-ai/rune
success Saved lockfile.
success Saved 14 new dependencies.
info Direct dependencies
└─ @hotg-ai/rune@0.6.2
info All dependencies
├─ @hotg-ai/rune@0.6.2
├─ @tensorflow/tfjs-backend-webgl@3.11.0
├─ @tensorflow/tfjs-converter@3.11.0
├─ @tensorflow/tfjs-core@3.11.0
├─ @tensorflow/tfjs-data@3.11.0
├─ @tensorflow/tfjs-layers@3.11.0
├─ @tensorflow/tfjs-tflite@0.0.1-alpha.7
├─ @tensorflow/tfjs@3.11.0
├─ @types/long@4.0.1
├─ @types/node-fetch@2.5.12
├─ @types/webgl2@0.0.6
├─ core-js@3.19.1
├─ form-data@3.0.1
└─ long@4.0.0
Due to a bug in @tensorflow/tfjs-tflite's NPM package, we need to
do some extra steps if we want to do inference with TensorFlow Lite models.
$ mkdir -p public/static
$ cd public/static
$ ln -s ../../node_modules/@tensorflow/tfjs-tflite/dist ./js
You should now be able to run yarn start and see the familiar React logo!
Creating the Rune
You have already spent a couple of lessons writing Runefiles, so we won't be
trying anything fancy with this Rune. All it'll do is take some data from a
RAW capability and send it straight to a SERIAL output.
image: runicos/base
version: 1

pipeline:
  input:
    capability: RAW
    outputs:
    - type: i32
      dimensions: [1]
  output:
    out: SERIAL
    inputs:
    - input
We want this Rune to be accessible from the web app so we'll tell rune build
to save it to the public/ folder.
$ rune build -o public/lesson-4.rune
   Compiling lesson-4 v0.0.0 (~/.cache/runes/lesson-4)
    Finished release [optimized] target(s) in 0.14s
$ ls public
favicon.ico  index.html  lesson-4.rune  logo192.png  logo512.png  manifest.json  robots.txt
                         ^^^^^^^^^^^^^
Creating the UI
Now we've got the project skeleton and a Rune out of the way, let's dive into some React code!
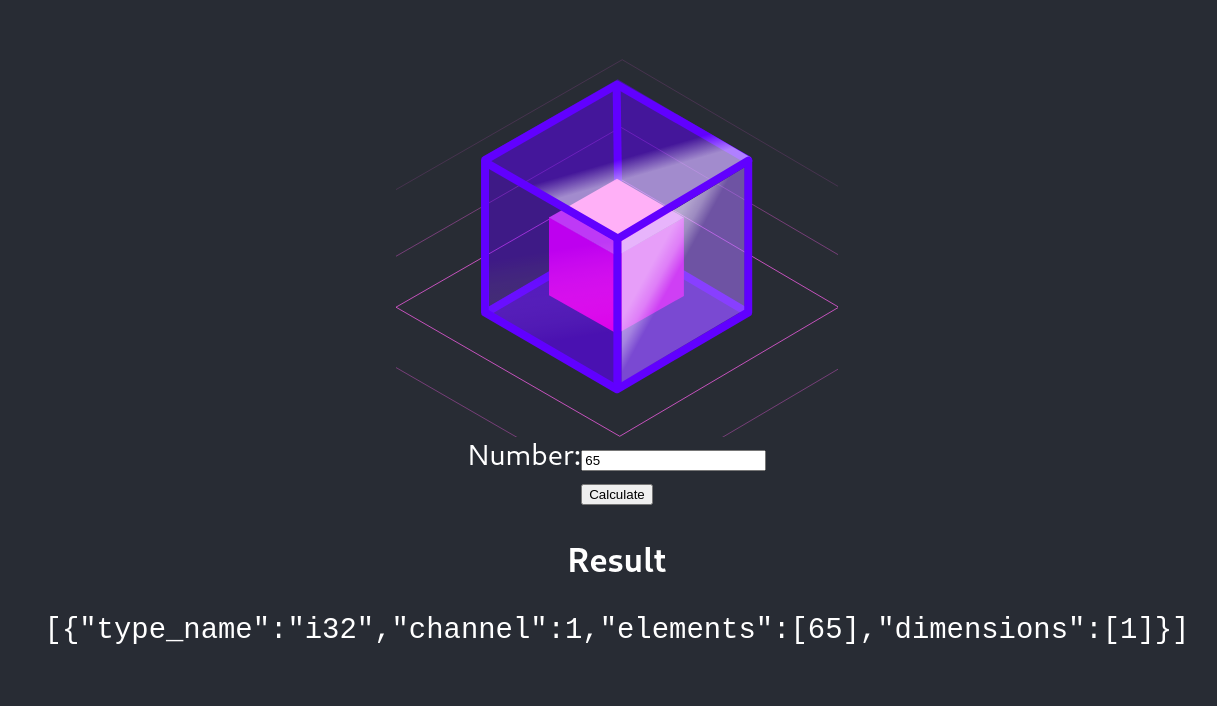
Our goal is to create a UI with a text box, a "Calculate" button, and an area to display the Rune's output.
At the very top of the src/App.tsx file we'll need some imports and
definitions.
import { builder, InputDescription, OutputValue, ReadInput, Result } from '@hotg-ai/rune';
import { Tensor, tensor1d } from '@tensorflow/tfjs-core';

type RunFunc = (r: ReadInput) => Result;
const runeURL = "/lesson-4.rune";
This app won't need any extra components, so we'll put all the state at the
top of the App functional component.
export default function App() {
  const [runtime, setRuntime] = useState<RunFunc>();
  const [number, setNumber] = useState(65.0);
  const [result, setResult] = useState("");

  ...
}
Notice that the number has a default value of 65.0. We'll use this when
checking our work at the very end.
We can use the useEffect() to make sure the lesson-4.rune is downloaded and
the Rune runtime is initialized when the page is first opened. To keep things
tidy, all of that logic will be put in an init() function that we'll define
in a bit.
export default function App() {
  ...

  // Initialize the runtime on startup
  useEffect(() => init(setRuntime), []);
  ...
}
We want to run the Rune whenever the user presses "Calculate", so let's define
a submit function which will pass the user's input to the Rune and save
the outputs to the result. Again, to keep things clean we'll be defining a
separate evaluate() function for running the Rune and reading results.
export default function App() {
  ...
  const submit = (e: FormEvent<HTMLFormElement>) => {
    e.preventDefault();
    if (!runtime) { return; }

    const result = evaluate(runtime, number);
    setResult(JSON.stringify(result));
  };
  ...
}
Keep in mind that we'll be loading the runtime on startup so there is a short
window when it won't be available. If this happens, the submit handler should
just return silently.
We also need to throw in a e.preventDefault() to make sure hitting "Calculate"
or pressing <enter> won't cause the page to refresh.
Finally, we have the JSX which defines our UI. For those who have used React before this won't be anything special, but if you are new to React then you may want to check out the official tutorial.
export default function App() {
  ...

  return (
    <div className="App">
      <header className="App-header">
        <img src={logo} className="App-logo" alt="logo" />
        <div>
          <form onSubmit={submit}>
            <div>
              <label>
                Number:
                <input type="number" value={number}
                  onChange={e => setNumber(parseInt(e.target.value))} />
              </label>
            </div>
            <input type="submit" value="Calculate" disabled={!runtime} />
          </form>

          <div>
            <h3>Result</h3>
            <pre><code>{result}</code></pre>
          </div>
        </div>
      </header>
    </div>
  );
}
Now we've defined our App component we can come back to the init() function
from before. The interesting bit is the builder().build() call - this uses
@hotg-ai/rune's high level builder API to configure the Rune runtime before it
is loaded.
In our case we aren't changing any of the defaults, but if you want
to you can handle any log statements from inside the Rune by passing a callback
to the onDebug() method, or you can register your own model handlers with the
withModelHandler() method (e.g. to handle models Rune doesn't support out of
the box).
function init(setRuntime: React.Dispatch<React.SetStateAction<RunFunc | undefined>>) {
  console.log("Loading the Rune");

  builder()
    .build(runeURL)
    .then(r => {
      console.log("Loaded the Rune");
      setRuntime(() => r);
    })
    .catch(console.error);
}
We also need to define the evaluate() function from earlier.
function evaluate(runtime: RunFunc, angle: number): OutputValue[] {
  console.log("Running the Rune");
  const { outputs } = runtime(input => generateInput(input, angle));

  console.log("Result:", outputs);
  return outputs;
}

function generateInput(input: InputDescription, number: number): Tensor {
  console.log("Generating", input);
  return tensor1d([number], "int32");
}
The runtime will use our generateInput() function if it wants to read from
a capability, using the InputDescription parameter to let you know what type
of capability it is (e.g. RAW) and any arguments that were specified in the
Runefile.
Normally you would inspect the InputDescriptor and generate the requested
data, but because we know this Rune only uses a single capability we can be
lazy and return a 1D int32 tensor (note: Rune uses i32 for 32-bit signed
integers, while tf.js prefers to call them int32).
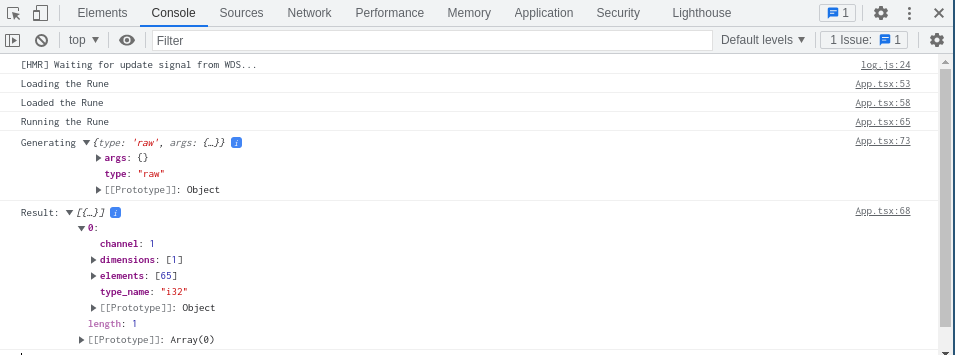
If we pull up the browser's developer tools, we can see the messages that were logged as the runtime was loaded and then run.
Validating Results
We can actually double-check the output using the rune CLI. The binary
representation of the number 65 is an A followed by 3 null bytes, so we can
use the printf command to generate an input.bin file containing exactly
those bytes.
$ printf 'A\0\0\0' > input.bin
$ python3 -c 'print(open("input.bin", "rb").read())'
b'A\x00\x00\x00'
From there, it's just a case of running rune run like normal and inspecting
the output.
$ rune run public/lesson-4.rune --raw input.bin
{"type_name":"i32","channel":1,"elements":[65],"dimensions":[1]}
Look at that, they're identical!